Need Storage Space for Your Guns and Gear, But Don’t Want to Pay Out the Ass? We Took a Weekend to Put Together This Storage Solution for Less Than $250
Now, you could just go out and buy a set of sliding drawers. Nothing wrong with that, and there are plenty of good companies who’ll gladly take your cash for an off-the-shelf product that’ll fit the bill. When you have a vehicle with other modifications, however, finding something tha’ll work with say, a rollcage or existing hardware like toolboxes or saddle tanks, then things start to get a bit spendy, as you’re now deep into the realm of the non-standard accessory. Or you could be like us, and just feel like paying in time rather than money is the way to go, and wish that Heinlein had added, “make a truck box,” to his list of stuff a man should be able to do.
We put this together over the course of a weekend, while taking plenty of breaks for important stuff like hitting the range and gym, as well as the inevitable Home Depot runs to pick up stuff we forgot. We’re giving you a complete list of hardware, as well as schematics for the critical items, so you don’t have that excuse.
This isn’t the be-all and end-all of designs. You can make it your own by adding refinements, such as locks, limit stops, flush-fit handles, and so on — or you could simplify it by omitting carpet. We framed out the whole bed and scribed around the wheel wells, but there’s no reason to go that route if you don’t need to keep the overall height to a minimum. We did, due to the presence of a slew ring and crew-served weapon mount up top, but we realize that’s not something that comes standard on every Kia.
With that in mind, the basic design shown here will fit between the wheel arches of any F-150 or Silverado. Go ahead and make it fit your needs.
The total amount of each item will be dependent on how long your truck bed is. Our Ballistic Bronco has a 6-foot bed; we had to shorten up the box due to the aforementioned cage, but you’ll need:
– ¾-inch exterior grade plywood (we used Radiata pine and wound up using three sheets with a fair amount of scrap)
– Skateboard bearings. A pack of 50 from Amazon will run you around $15 and leave you with a handful of spares
– 8mm x 60mm bolts — these act as axles for the bearings
– ¼-inch washers — budget five per bearing used
– 8mm nuts
– Thread locker
– 1-inch square tube — four pieces, each 4 inches shorter than the overall length of your drawers
– 1.25-inch long cabinet screws
– Polyurethane adhesive, such as Gorilla Glue
– Drawer handles
– Carpet offcuts
– Stain
– Circular saw
– Combo square
– Tape measure
– Utility knife
– Shears
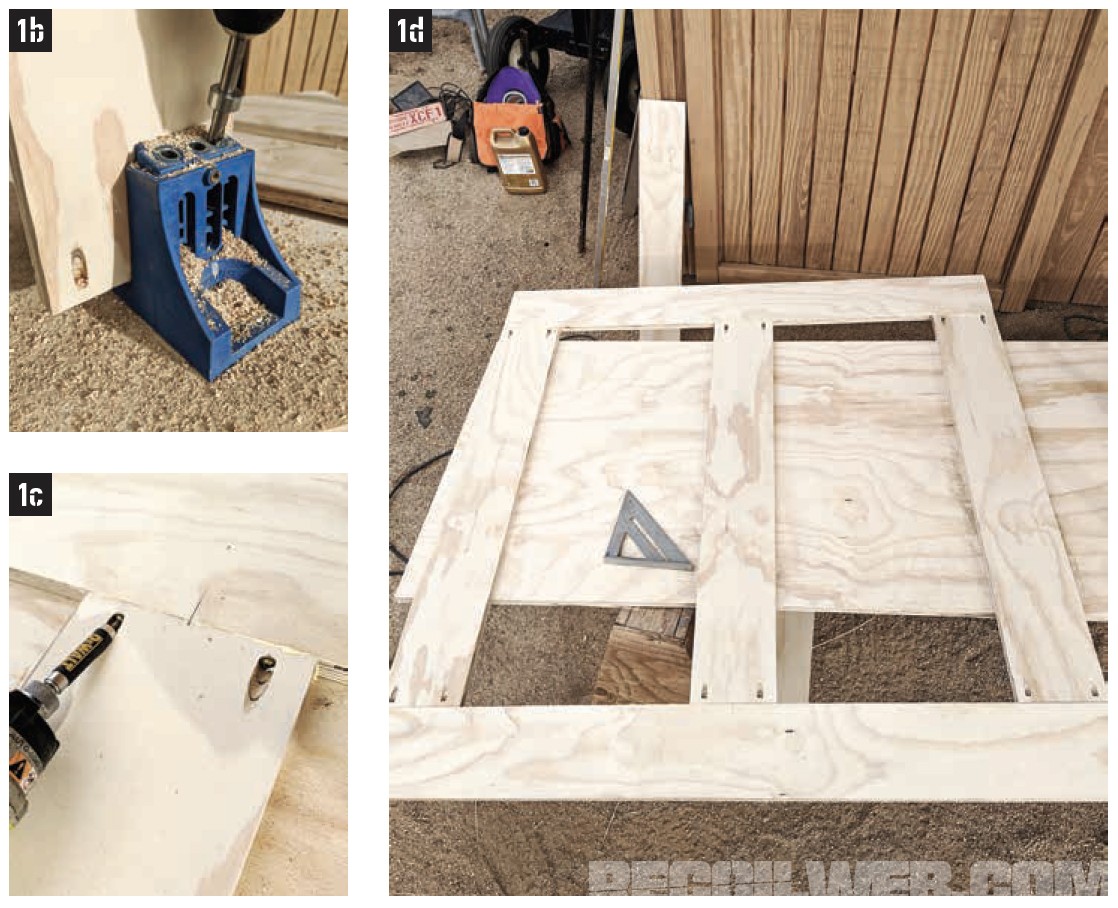
– Kreg jig
– Cordless drill
– Clamps
– Staple gun
– Jigsaw
– Router with 1/8-inch roundover bit
– Impact driver (not really necessary)
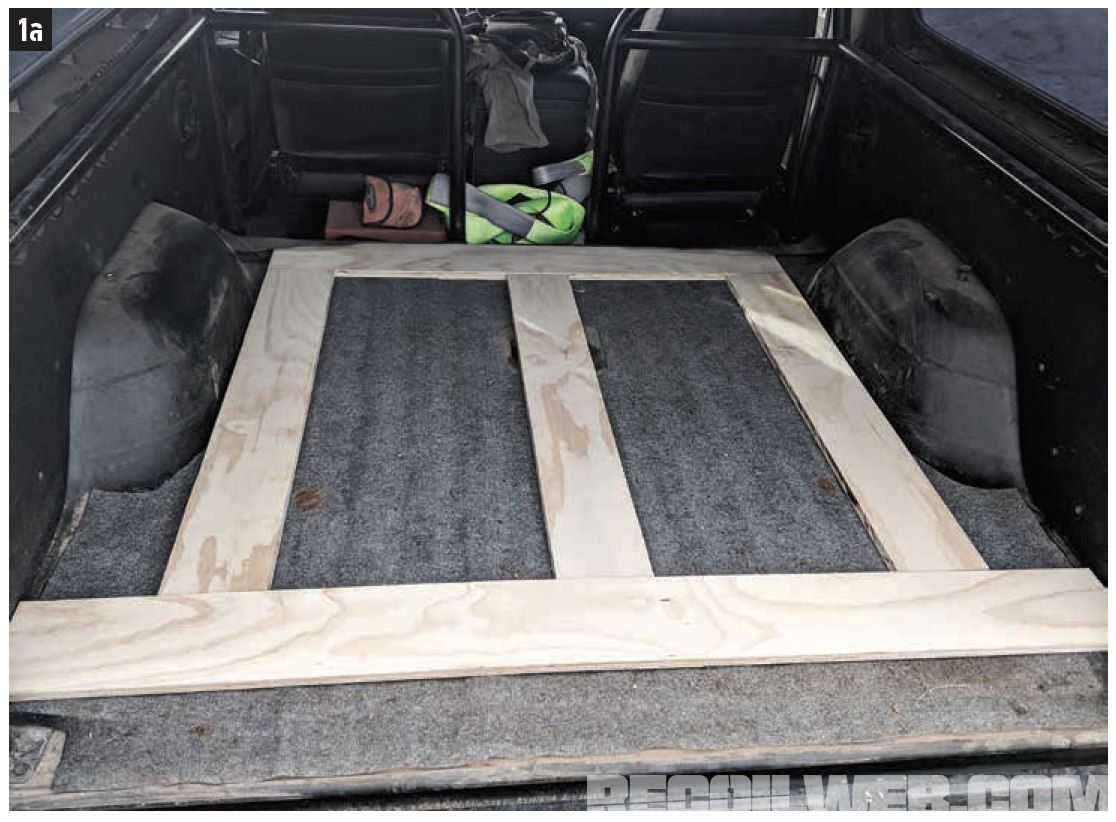
1. Start by framing out the base. We used 6-inch strips of plywood and laid them out across the bed to define the truck box outline. If you plan on being a basic bitch, then the simplest method would be to use one complete sheet as the truck box base, but this is both heavy and unnecessary from a structural standpoint. You can easily skeletonize the base, as the joints are in compression and only need to carry loads from the sidewalls, so this the perfect opportunity to bust out the Kreg jig. Glue and screw everything together, and run a couple of sheetmetal screws through the crossmember closest to the cab into the truck bed. Don’t worry. It’s a truck, FFS.
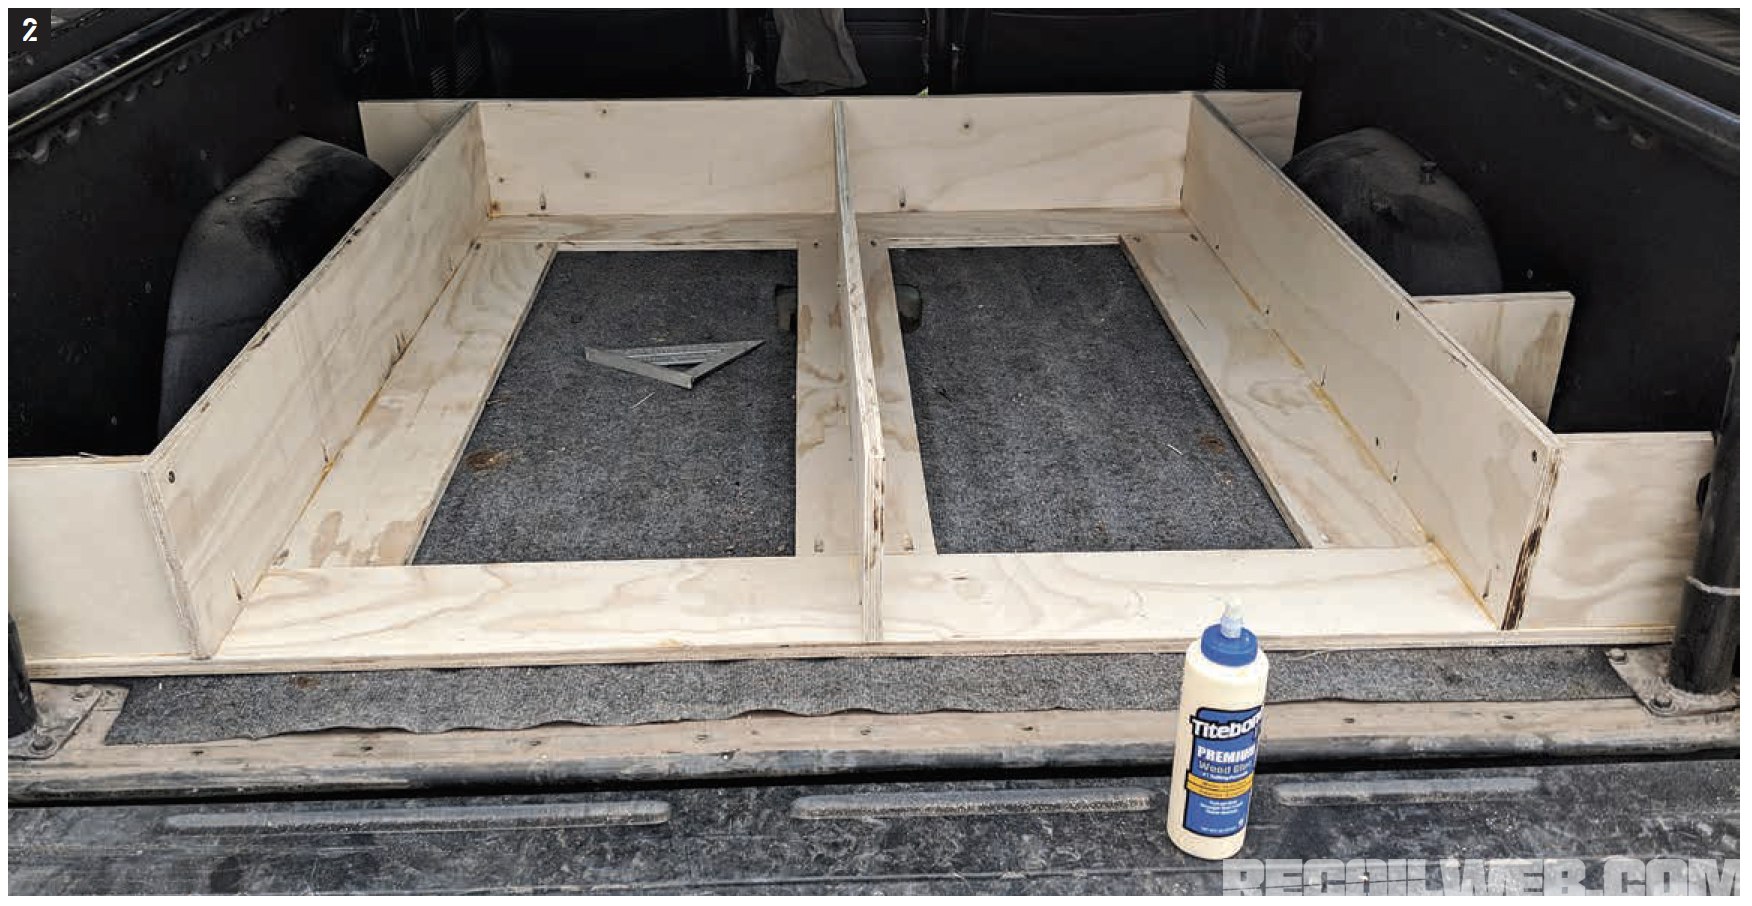
2. Attach the side and back walls. Make sure you use either a clamp block or speed square to ensure you don’t have any problems later on down the line. More glue and cabinet screws.
3. Once the walls are in place, it’s time to frame up the boxes. Size each one to fit its respective place in the base assembly, and lay out to leave a 1⁄8-inch gap between the side walls and the drawer sliders, as well as a ½-inch gap top and bottom.
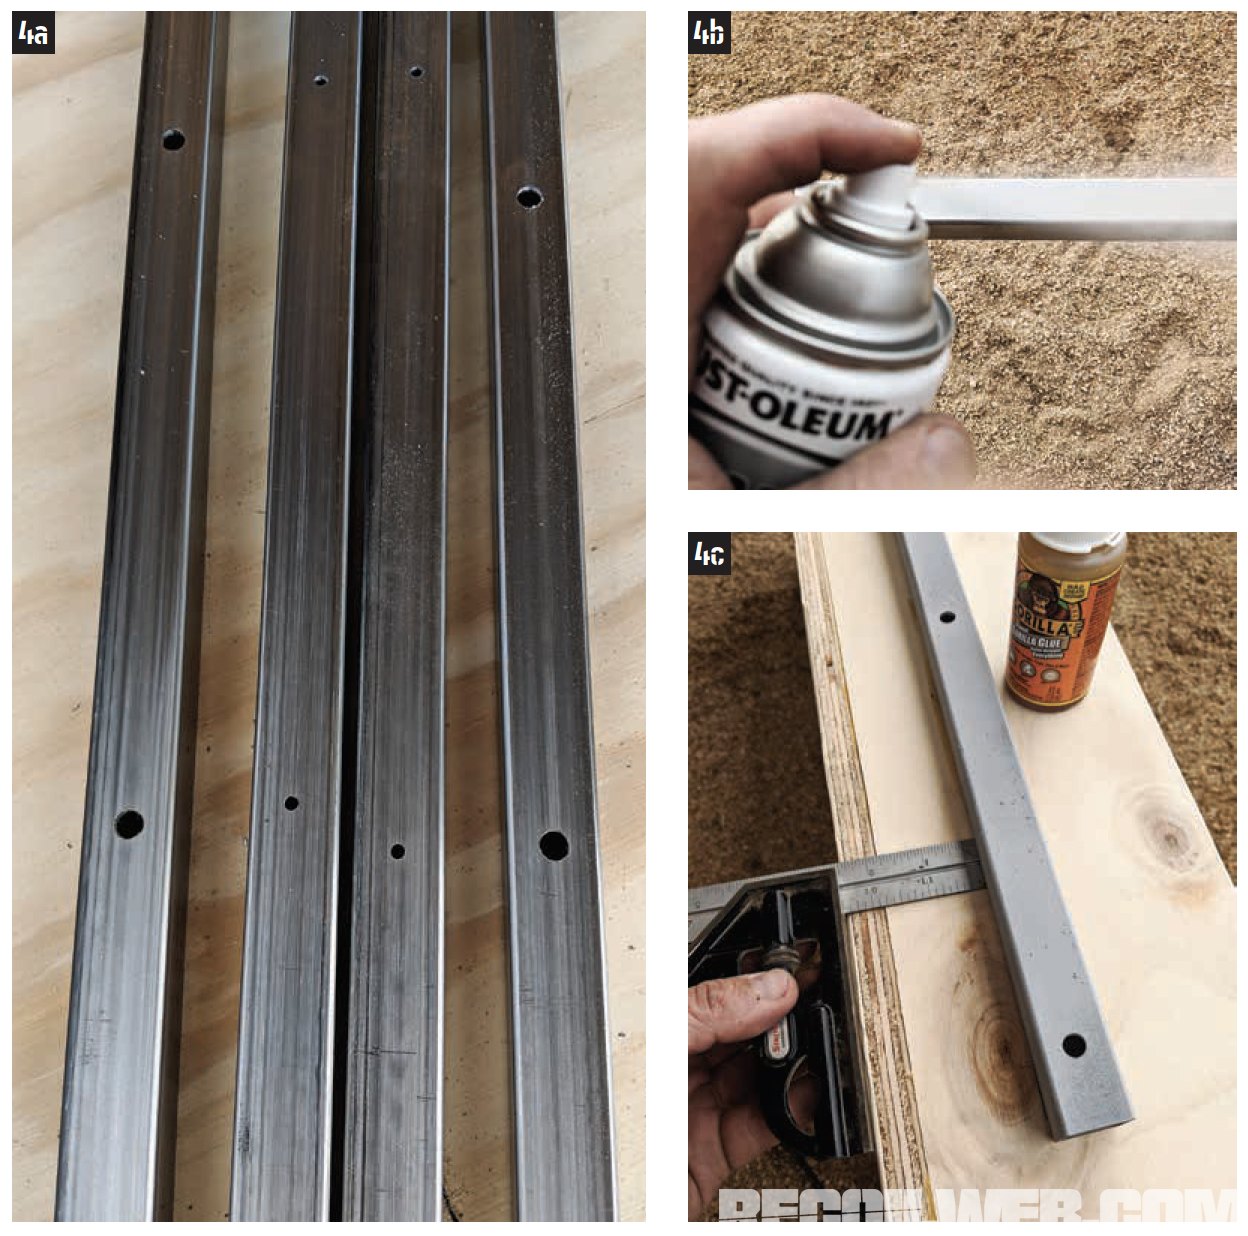
4. Prepare the sliders by pilot drilling a hole through both sides, every 8 inches. Open up the hole on the outside face so that a ¾-inch screw head can pass through, then degrease and prime with auto primer. Once dry, use your combo square to ensure they’re parallel to the bottom of the box base and attach with glue and screws.
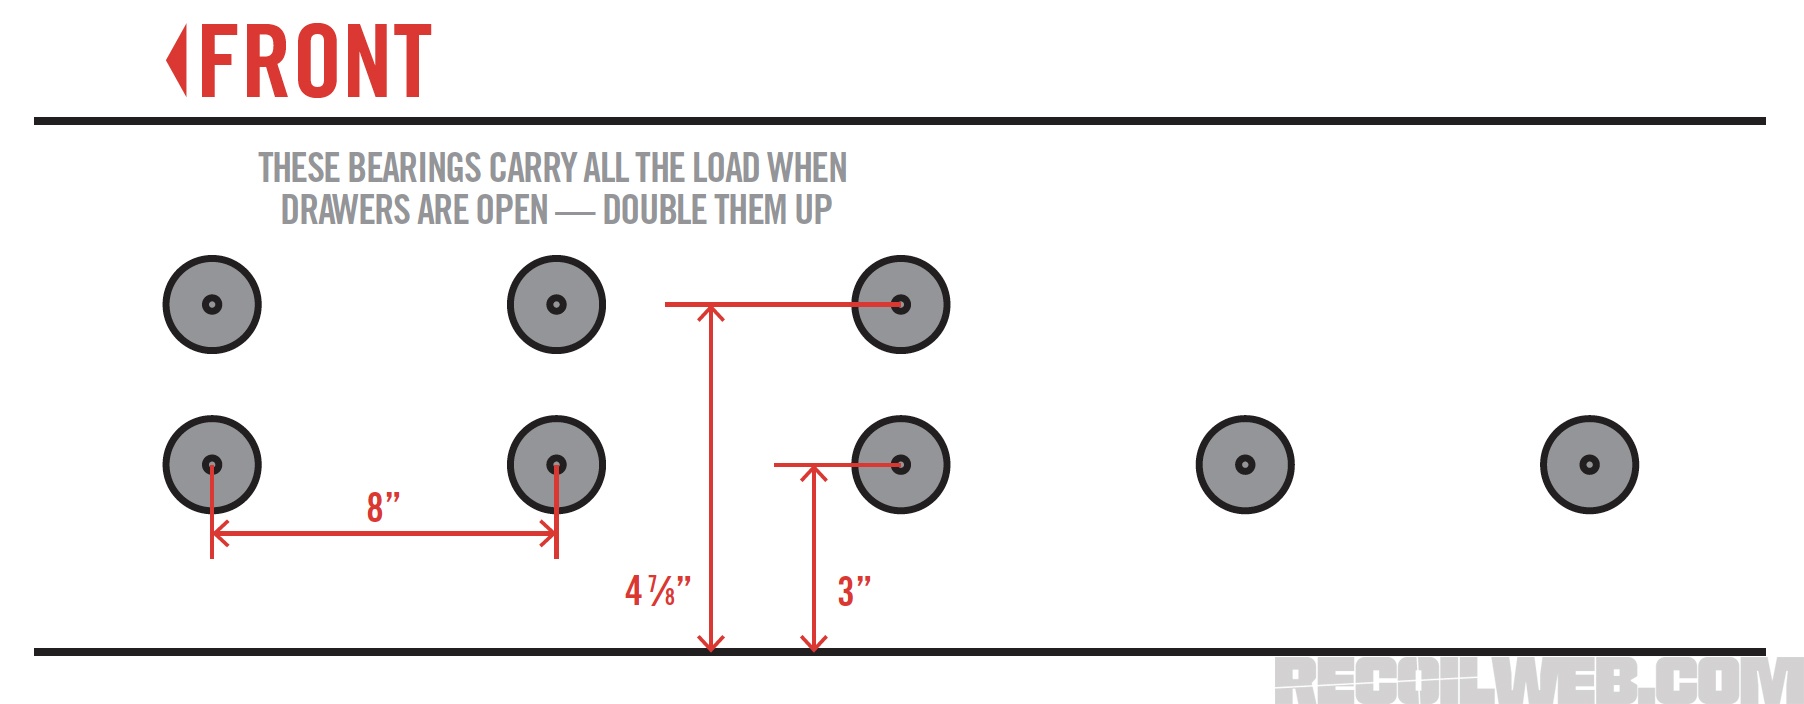
5. Make a drill jig from a scrap of plywood to help with getting your bolt holes in the right place. Lay this out according to the diagram below. When the drawers are open, the set of bottom bearings closest to you act as a pivot point and transfer force onto the upper set of bearings, so these need to be closer together in order to handle the load.
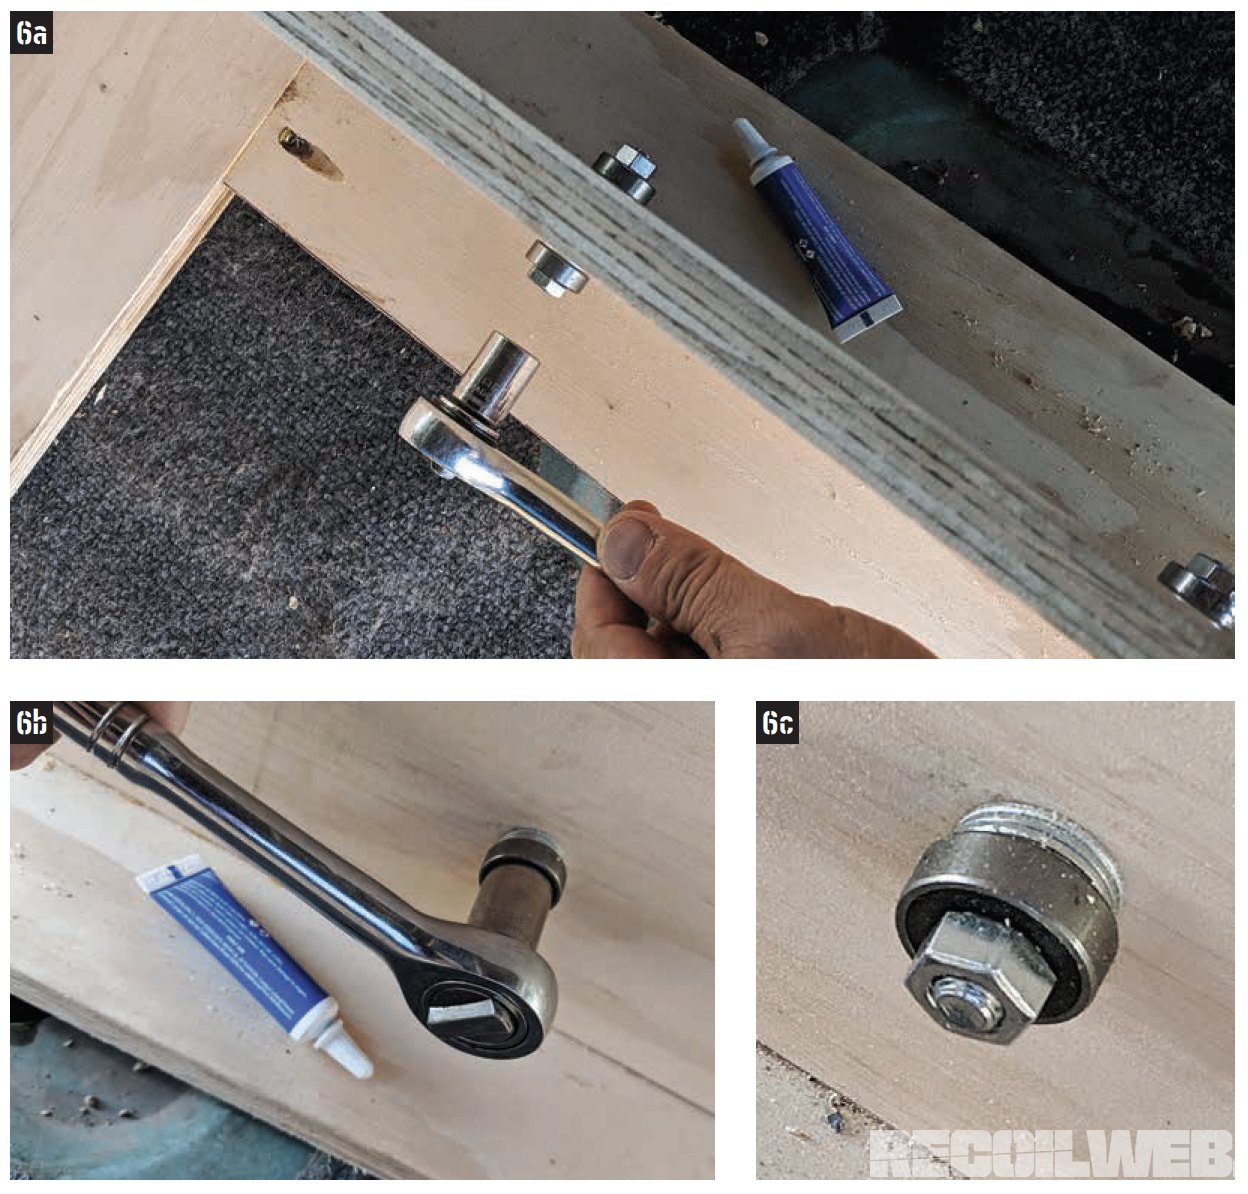
6. Drill your bearing axle holes, then assemble your bearings. Use stacked washers to shift the bearing away from the sidewalls and center it up on the drawer sliders. Use thread locker, as you don’t want to be fishing inside the drawer assembly six months down the line in order to retighten a nut that’s worked loose.
7. Screw down the lid.
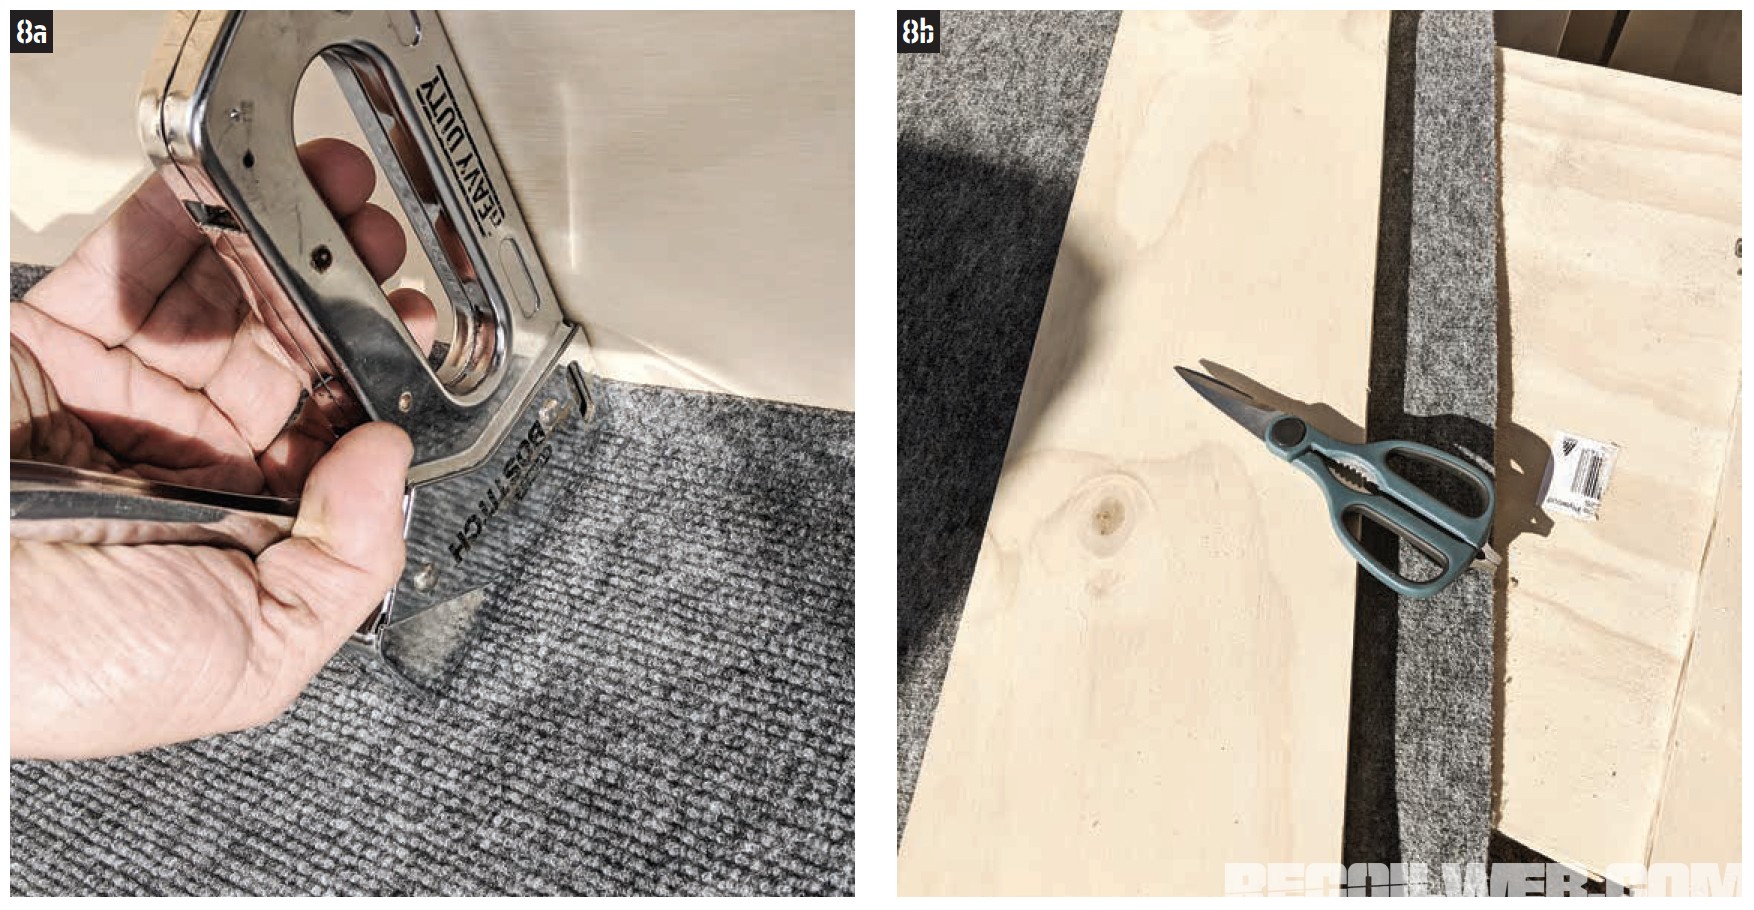
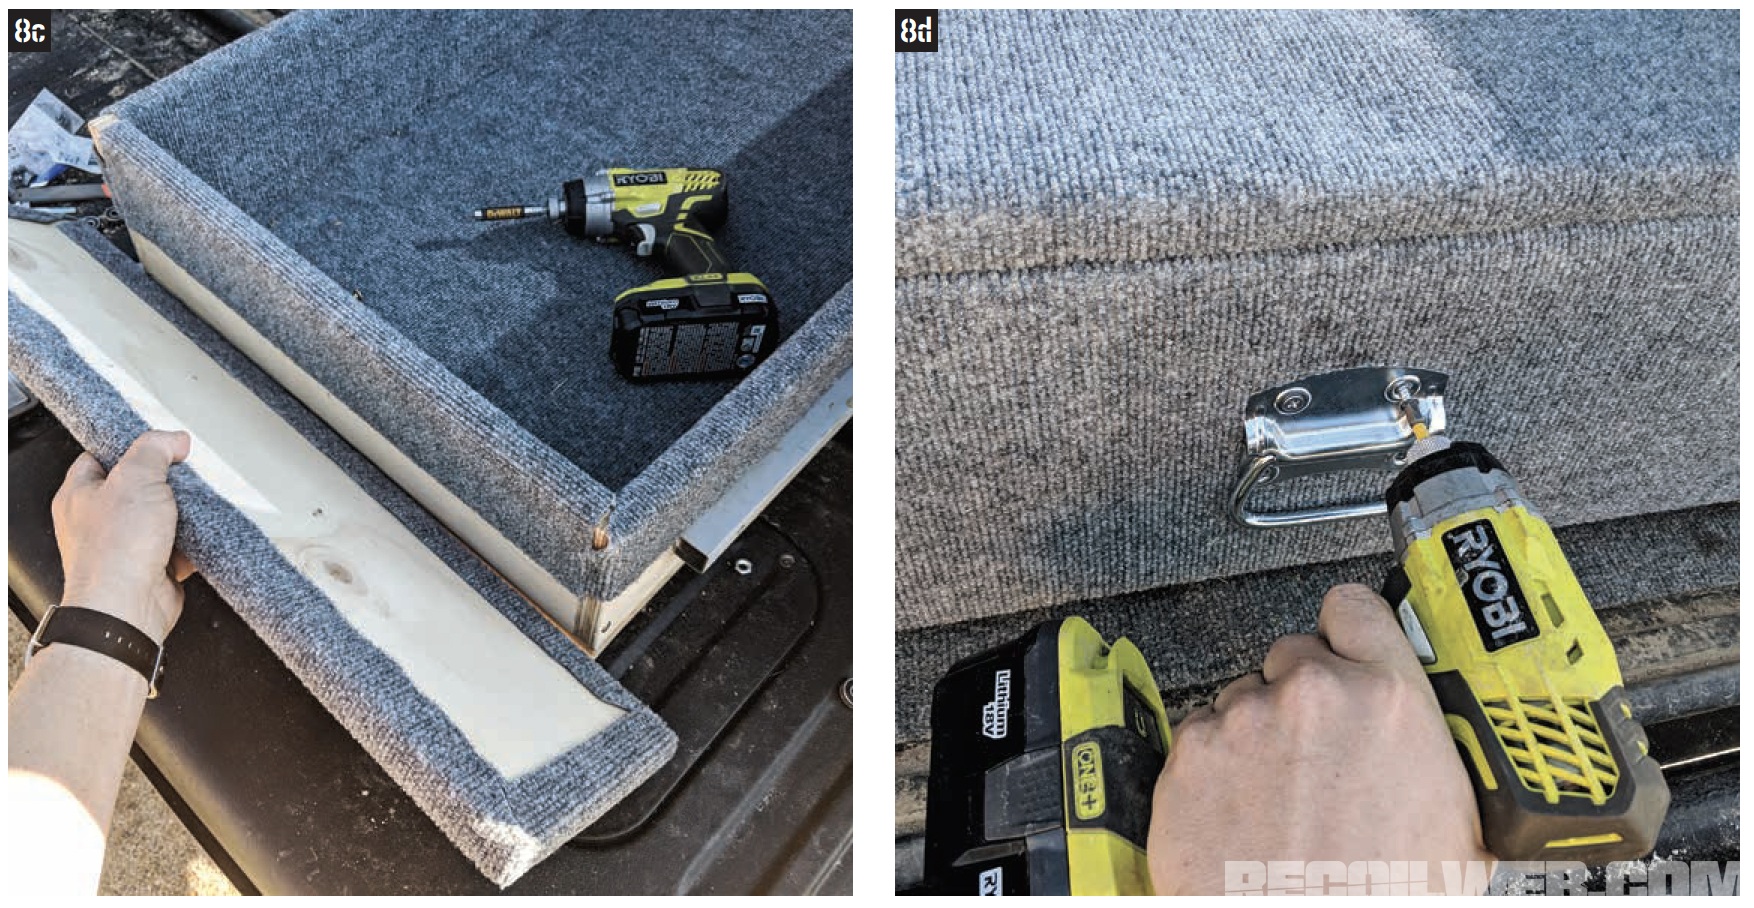
8. Slide the drawers in and test for function. At this point, you should have a basic but serviceable way to cart your stuff. But we can do better. Using a few outdoor carpet offcuts, line the drawers to keep your guns from banging around. If you want, carpet the top of the lid also. If you really want to go overboard, then make drawer fronts and carpet those before attaching them to the drawers, but if you’re at the stage in your carpentry skills where you want to make drawer fronts, you don’t need us to tell you how to do that.
Once you’re happy with the fruits of your labor, kick back, crack open a cold one, and text your buddies pics to establish your dominance of the DIY truck box universe.
Since our founding in 2012, RECOIL remains the premier firearms lifestyle publication for the modern shooting enthusiast. We deliver cutting-edge coverage of guns, gear, accessories and technology. We go beyond basic reviews, providing no B.S. buyer’s guides, hands-on testing and expert analysis on everything from firearms and survival equipment to watches and vehicles.
Our reviewers are the backbone of our operation and come from diverse shooting backgrounds: Former law enforcement, military veterans, competitive shooters, seasoned hunters and plain old firearms enthusiasts. Furthermore, we’re not just gun experts, but dedicated journalists who adhere to the strictest standards of our profession.
At RECOIL, editorial independence is the foundation of everything we publish and the cornerstone of reader trust. Our editors, writers and content creators make all editorial decisions independently, free from outside influence. That boils down to: advertisers don’t dictate our coverage, the outcomes of our reviews or what we recommend in our buyer’s guides. First and always, our commitment is to our audience—ensuring every review and article is accurate, unbiased, and driven by real-world experience.
Whether you’re selecting your next firearm, upgrading your gear, or exploring the latest innovations in the shooting world, RECOIL provides the trusted insights you need to make informed decisions. Learn more about our Editorial Standards and how we review products.
A throwback from the Cabinet of Curiosities when we first reviewed the Beretta 1301 Competition…
NEW from Midwest Industries is the Combat Rail HD Handguard! Built for duty durability with…
Everyone needs some .22 LR in their life, and the Super Wrangler gives you that…
New to the world of suppressors is a brand you should get to know; Jaguar…
Lightweight, improved, and with the best out-of-the-box 10/22 trigger yet, the Ruger 10/22 Carbon Fiber…
RECOIL has teamed up with the elite optics team at EOTECH to give one lucky…
View Comments
nice but took 6 sheets plywood at 65 dollars per sheet. 2 guys 9 hrs of building.
I’ve got $400 in mine. We made one drawe in stead of 2. Should work for taking my gun and equipment to the range.